Get ExpressVPN on Windows.
Need a VPN for Windows?
Get ExpressVPN Now
Refer a friend to use ExpressVPN.
Love ExpressVPN? Want a free month?
Refer a Friend Now

This tutorial will show you how to share your VPN connection from your Windows 8 or Windows 10. This will allow your other devices to use the VPN connection shared from your Windows device.

Before you begin, make sure to set up the ExpressVPN app on your Windows device. Do not connect to the app when setting up the virtual router or mobile hotspot.

Jump to…

Windows 8: Set up your virtual router
Windows 10: Set up your mobile hotspot
Connect to the ExpressVPN app
Connect devices to the VPN connection
Disable the VPN connection


Windows 8: Set up your virtual router

1. Verify your Windows device can create a virtual router

To share a VPN connection from your Windows device, you will need to verify that your device can create a virtual router.

On your Windows device, press Window's Start button. + S to launch the search bar.

Type cmd. Right-click Command Prompt and click Run as administrator.

Click "Run as administrator."

In the Command Prompt, enter the following command:

netsh wlan show drivers

Type the command in the Command Prompt.

If you see “Hosted network supported: Yes,” your Windows device can support creating a virtual router.

A command prompt that shows "Yes" to "Hosted network supported."

If you do not see this message, you may need to update your network adapter drivers.

2. Create your virtual router

In the Command Prompt, type the following command:

netsh wlan set hostednetwork mode=allow ssid=NETWORKNAME key=PASSWORD

  • For NETWORKNAME: Set a name for the VPN connection you will share.
  • For PASSWORD: Set a password to allow devices to join the VPN connection.

Hit Enter.

Name your virtual router in the command prompt.

You will then see this message:

The hosted network mode has been set to allow.
The SSID of the hosted network has been successfully changed.
The user key passphrase of the hosted network has been successfully changed.

The hosted network has been set to allow.

You have successfully created a virtual router.

3. Start your virtual router

Important: Do not connect to the ExpressVPN app.

In the Command Prompt, enter the following:

netsh wlan start hostednetwork

Start your virtual router.

You will see a message that says, “The hosted network started.”

Your hosted network started.

If you get a message saying the hosted network could not be started, update your network adapter drivers.

4. Enable your virtual router

On your Windows device, press Window's Start button. + R to open the Run prompt.

Type ncpa.cpl and click OK.

Click "OK."

In the Network Connections window, you will see a new network called Local Area Connection*. This is the virtual router you created earlier.

Note the name of the connection.

Find a network with the description ExpressVPN Tap Adapter. Right-click it and select Properties.

Select "Properties."

Click the Sharing tab. Check the box for Allow other network users to connect through this computer’s Internet connection.

Under Home networking connection, select the name of the virtual router (Local Area Connection*) you created earlier. Click OK.

Click "OK."

Proceed to connect to the ExpressVPN app.

Need help? Contact the ExpressVPN Support Team for immediate assistance.

Back to top


Windows 10: Set up your mobile hotspot

On your Windows device, click Window's Start button.. Click Settings > Network & Internet.

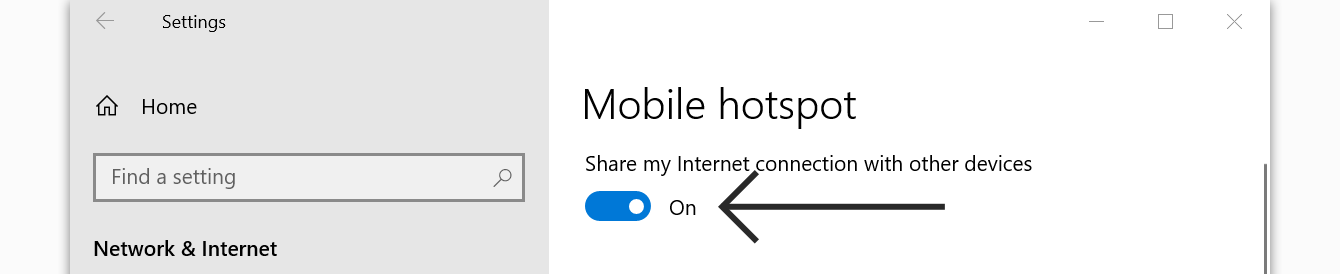
Click Mobile hotspot. Toggle Mobile hotspot on.

Toggle your "Mobile hotspot" on.

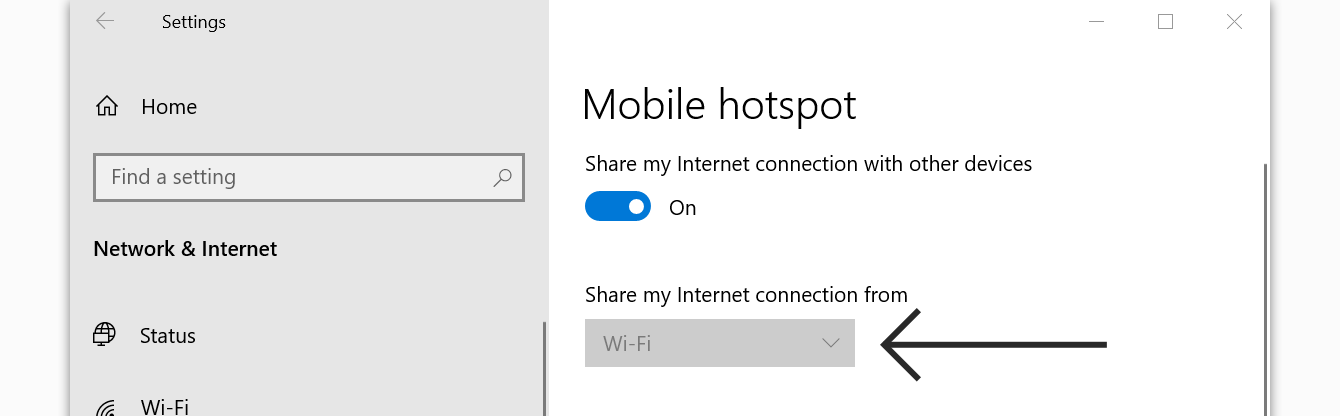
Under Share my Internet connection from, select Wi-Fi.

Select "Wi-Fi."

Click Edit.

Click "Edit."

Enter the following details:

  • Network name: Enter a name for the mobile hotspot you will share.
  • Network password: Enter a password to allow devices to join the mobile hotspot.

Click Save.
Click "Save."

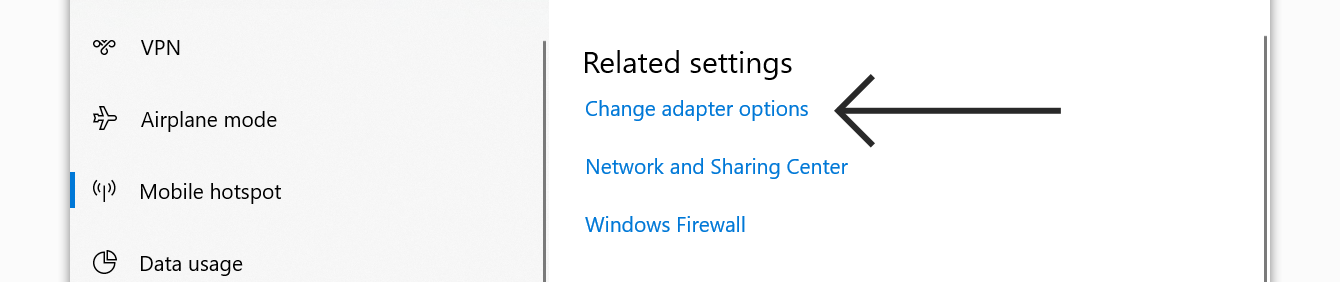
Under Related settings, click Change adapter options.

Click "Change adapter options."

In the Network Connections window, you will see a network called Local Area Connection*. This is the new mobile hotspot you just created.

You will see a network called “Local Area Connection.”

Find a network with the description ExpressVPN Wintun Driver. Right-click it and select Properties.

Click “Properties.”

At the top, click the Sharing tab.

Click “Sharing.”

Check the box for Allow other network users to connect through this computer’s Internet connection.

Check the box for “Allow other network users to connect through this computer’s Internet connection.”

Under Home networking connection, select the name of the mobile hotspot (Local Area Connection*) you just created. Click OK.

Click “OK.”

Proceed to connect to the ExpressVPN app.

Need help? Contact the ExpressVPN Support Team for immediate assistance.

Back to top


Connect to the ExpressVPN app

  1. On your Windows device, open the ExpressVPN app.
  2. Connect to a VPN server location of your choice.

Proceed to connect your devices to the VPN connection.

Need help? Contact the ExpressVPN Support Team for immediate assistance.

Back to top


Connect devices to the VPN connection

  1. On a separate device, go to your Wi-Fi settings.
  2. Find the name of the network you created earlier.

To verify you are connected, you can use ExpressVPN’s IP Address Checker to check your IP address and location. They should match the IP address and location shown on the ExpressVPN app.

Need help? Contact the ExpressVPN Support Team for immediate assistance.

Back to top


Disable the VPN connection

  1. On your Windows device, click Window's Start button..
  2. Click Settings > Network & Internet > Mobile hotspot.
  3. Toggle Mobile hotspot off.

Need help? Contact the ExpressVPN Support Team for immediate assistance.

Back to top

Open Command Prompt and enter the following command:

netsh wlan stop hostednetwork

Stop hosted network in the Command Prompt.

You will see a message that says, “The hosted network stopped.”

The hosted network stopped.

Need help? Contact the ExpressVPN Support Team for immediate assistance.

Back to top

Was this article helpful?

We're sorry to hear that. Let us know how we can improve.

A member of our Support Team will follow up on your issue.